A Push Button Horse: Beginning Leg Cues for Turning on the Fore
The shortest distance between two points is through the ground.
If you want a push-button horse, you must install the buttons. That is best done from the ground. Well-trained horses uses leg cues, face cues, and seat cues to anticipate what their rider wants them to do. A really well-trained horse and rider can perform with leg and seat cues alone. That is the fancy “bridleless” horse you see at exhibitions.
Leg cues are used to tell the horse which part of his body to move which direction. Leg yields are used specifically to move him laterally. Simply put, your horse will feel your leg or heel pressure on a certain spot on his body, and move away from the pressure (Yield) with that part of his body. The object is to have your horse move his body off of a leg pressure so slight that a bystander cannot even tell that you have moved your leg or requested any action from your horse. It is difficult for both the horse and rider at first. But, after practice, both of you will become fluid and much more relaxed. (Also see Contact)
Your horse learned during his ground training that moving away from pressure will end the pressure. This is central to his understanding that under saddle he should do the same: move away from the pressure.
Two legs pressuring his girth in a “neutral” position (neither forward nor behind the girth) moves him straight ahead.
Right leg pressuring his girth (slightly forward of the cinch) will move his shoulder away to the left.
Right leg pressure behind the middle (just behind the cinch) should move his hind quarters away to the left.
Right leg pressure middle should help him move his rib cage away or up so that he moves his whole body left.
Find the Button Locations
Start in the round pen with a haltered and saddled horse. Standing facing his side with your lead rope bending his head slightly toward you, pick up the stirrup and see where the stirrup contacts the horse in a natural “neutral” position. Now pull the stirrup forward about 6 in front of the cinch and touch his side. Then push the stirrup back 10″ behind the cinch and note that spot. These areas are a little exaggerated at first so that he will get a clear picture of which parts of his body to move with which point. As you perfect the yields, the areas will move a little closer together and he will discern with more precision.
It is the first stage of all precision riding. For weekend trail riders, it is important to be able to maneuver your horse away from trees on the trail, toward gates for opening, turning around in tight or dangerous places. An additional benefit: any horse being asked to “dance” by moving this way and that quickly and smoothly will also automatically collect and balance better. He will look more attractive, his physique and muscles in his back will improve, his attitude will be more engaged, and his ride will be smoother.
See Pressure Points of a Horse
This lesson uses several of the theories explained in other parts of this manual: Yielding to pressure, Release-Reward, Pairing Responses, and Fine-Tuning Responses. It also builds on Flex Training
I recently had the unpleasant experience of watching a horse being forced into fast turns with face and bit pressures only. The unfortunate green horse was having his face hauled to and fro and ended up with a very sore mouth while being “taught” to “follow” his face. He didn’t know what was being asked, and he fought the face pressure in a panicky attempt to get away from it. Had the horse (and/or rider) been proficient in leg cues, the whole scene would have been very different. He would have at least had a clue what to do with his body as his face was being jerked around.
You can haul on that horse till dooms day. However, when you are through, he will have a very sore (or hard) mouth, and you will have sore shoulders and arms. It will take at least twice as long, and he will lack willingness and finesse in every way. He will probably become a “head thrower”, a “bit resister”, and will never use correct carriage or balance.
Dragging a horse to and fro with his head will invariably drop his shoulder and cause his weight to be continually on his front, taking away all possibility of a properly balanced or collected movement and end any chance for collection or nimble foot work.
Disengage the Rear Using Direct Pressure
The goal of this exercise is to get a horse to move his fanny away from you with the touch of your hand (or heel) on his side or his butt. It is very practical when you are grooming or tacking or in tight quarters and you want him to change his position without a fight or a pushing match. There are other times when moving his rear away makes life easier. This is also the introduction for pressure in an area that you will use when under saddle to disengage his rear with your boot or spur.
This part of the Rear Disengage is accomplished only if the horse is de-sensitized to your hands and touch.
To accomplish this move-over, stand facing your horse’s side, hold your rope loops in your halter-side hand and about 1 foot of popper that can be bounced off of his rear in the other.

Step 1
On the near side, grab the lead rope so that you can gently tip your horse’s face toward you. Using your left fist or knuckle (which is holding the rope with that little bit of tension), press into his side at the rear position (just in front of the point where his back cinch would rest) to nudge him away. Start with light pressure, as this signal (cue) should remain light as a feather. Anticipate that he might move INTO the pressure at first, leaning on your fist.
If he does not move at the count of 1-1000 2-1000, lightly tap or twirl your popper at his fanny, increasing in intensity until he takes a step away. Stop all pressure and rub the “nudge” away while he rests pressure-free.
Always rub the nudge until the horse stops moving his feet and gets soft. The rub-away is a cue that you are no longer pressing the exercise.
Sensitive horses jump right away from the tap. Duller horses may need you to build the intensity of the tap until they move. The goal is to start with minimal pressure, working up in intensity until you get a correct response.
Remember that he learns from your release, not your push. The moment he moves his rear way (just one baby step will do), release the pressure and gently rub the yield spot until he stops moving his feet and softens his head and neck into the Flex. He is not finished until his feet are still and his face is softly flexing. Let him rest a moment or two. Then repeat the exercise.
Step 2 Each time he responds, release your hand pressure AND tapping pressure immediately, rub the area gently, and rest. Resting is easier than working, so you will find that he will start to move more quickly with less and less pressure to get to the “sweet spot”: rest. Now train the other side. (see Two Brains)
Note: Done properly, horses become very sensitive to your pressure requests. In fact a willing horse will become overly sensitive, moving constantly as your hand or heel just touches him. Always rub the nudge area until the horse stops moving his feet and relaxes. The rub-away is a cue that you are no longer asking for movement. If you find your horse becoming too sensitive, spend 3 times more time rubbing the “button” areas than you do pressing them.
Proper Step-Across
He learned in his initial rear disengage exercises that moving away was sufficient. However, it is important that he pass the close rear foot IN FRONT OF (over the top of) the far foot.
This might seem like a nit-picky detail, but it is very important for two reasons:
Reason # 1: He is more nimble when his rear legs cross comfortably instead of stumbling into each other.
Reason # 2: More importantly, a horse cannot be agressive AND cross over at the same time. So if you are dealing with a pushy or aggressive horse, it is of paramount importance that you take his rear power away by demanding that he cross his rear legs: No kicking. No bullying you.
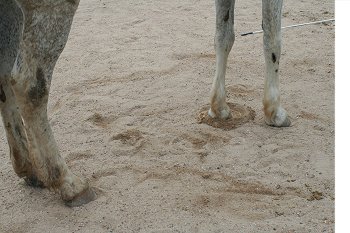
If he steps behind during the exercise, it will not count as a correct disengagement. Don’t release the pressure until he moves CORRECTLY. We will SHAPE his new dance step into correct choreography and multiple steps as he gets better, faster, and lighter to the touch. Done correctly, you should be able to look at the ground and see that his near front leg has not moved. He has “drilled” a hole into the ground with that leg and walked around it with his hind end.
Repeat until he moves on the nudge pressure without the popper.
Remember that he will be as light and easy to move as your first nudge/pressure-contact, so the request pressure should be small and light: just enough that he notices you are pressing a little. Don’t increase the request pressure, increase the tap until he moves.
Tips: Bending his neck is important. The more his neck is bent toward you, the easier it is to move his rear around. If he starts to move away BEFORE you can give him a cue, do some flexing so he does not always anticipate movement. Intersperse some rope-rubbing and de-sensitizing up and down his body with NO disengage between the moving exercises.
 Perform the same procedure using his haunch as the pressure point.
Now you have a horse whose rear is easy to maneuver in any circumstance with the lightest cue.
Potential Problems:
A very sensitive horse will over-react and go flying away. Lower the popper pressure until you get a calmer response.
A lazy horse will ignore your nudge until he gets a much firmer tap. He may need a spank! after a gentle nudge. Watch and be careful of a pushy horse that might kick out at you.
A horse that kicks out needs a serious spank. Just stay out of the kick zone when you do this.
If the horse walks in a circle instead of pivoting, bring her head around much further. If her head is tipped further toward her ribs, it is harder to walk out of the maneuver.
Anticipation: Horses quickly think that any time you move to their side and/or tip their head in, you will ask for the rear disengage. If that is the case, intersperse more flex-only exercises so that she cannot anticipate which you will want. Also, if you are not going to ask for movement, gently run your hand down her back or side as you go from head to tail. That seems to steady them.
You don’t want him to start moving constantly to every touch or tickle. To aviod a horse who is too sensitive or nervous in anticipation of your requests, spend more time rubbing the “button area” than pushing the button. Unfortunately, none of the videos demonstrates the rub-away finish.
A horse will be as light as the lightest request you give him. If you start very light and he learns to anticipate at the lightest cue, he will be very sensitive to your request.
In the case of the first disengage maneuver, the lightest cue was your body posture and visual gaze at his rear haunch. In the case of the hand-pressure cue, the hand is just insistent enough that he notices your request. In the case of the saddle leg cue, the stirrup takes the place of the hand.
This video shows the beginning stages, no touch, just intention pressure.
The horse in this next video is fairly new to the direct-pressure request. He is being cued by a small pulsating (driving) nudge in the side. It is not the exact procedure described verbally above, but it is effective. If he doesn’t move, the handler uses his hand to tap the fanny instead of a popper.
Three weeks later, Reign has long-since mastered the direct hand pressure request. We are getting to the nitty gritty of teaching him to disengage using stirrup pressure – the last ground exercise before performing with a rider in the saddle.
Move on to Teaching the Front Leg Cue on the Ground
Thank you Kristull Ranch in Austin, Texas for the horses and pictures. The demonstrator horses are Scrimshaw, a 15 yr old paint mare and Kristull Reign, an 8-yr-old 3/4 Friesian X Tennessee Walker who was imprinted at birth but never started any type of training until he was brought in from his pasture life as a 6-yr-old.
Horse training can be dangerous. Not all methods work on all horses. Instruction presented here is not meant to be prescriptive in nature, and Horse-Pros.com takes no responsibility for the welfare of any animal or person using our methods.
We certainly don’t know everything. Please share your expertise and experiences. Comment on what is already written or Suggest a Category and Educate us about it. Grow Horse-Pros.com©
Horse training and equestrian activities in general can be dangerous. While we try to present relevant and valuable content, under no circumstances does horse-pros.com or its members or contributors take any responsibility for the well-being of any horse or person using a method outlined here.
We certainly don’t know everything. Please share your expertise and experiences. Comment on what is already written or Suggest a Category and Educate us about it. Grow Horse-Pros.com©
My horse, Rodney, picked up pretty quickly on spinning his rear, but he WILL not, in any case,
put is back foot over the other; he uses his front feet and back feet to spin, and not just move his rear. I waited for more than ten minutes just spinning, and spinning, and spinning; He never even hinted at doing it the right way. Every time I release the pressure I am just reinforcing this habit. Is there any way I can fix that? I tried all the advice in this article, and nothing worked on him.
Have you trained him on the ground with the rear-disengage exercises? That is the first step for sure. As you stand at his side (like when you tighten the cinch) gently push your fist into his rear ribs (furthest back red circle at the top of this page) with one hand, simulating your rear leg cue, while tapping his fanny rhythmically with the popper – first lightly, then more insistently, then TAP, TAP,TAP. When he takes one step away with his rear, stop tapping and let him rest. When he takes a step consistently, require the rear cross before you stop tapping. Don’t let his front come toward you. Stand your ground at the cinch (girth) while making his rear move away. You must teach this cross-over “dance step” on the ground before he will use it easily under saddle.
Don’t try to physically push him. That usually results in your dragging his head around with you as you chase his rear – which causes him to bring his front feet around to travel with you.
When he can do this well and lightly, taking several cross-over steps and consistently getting it right on the ground, then you can go to the mounted version.
Mounted, stand him next to and parallel to a pasture or round pen fence so that his front feet have nowhere to go when his rear is asked to move away from the fence. This just takes away one option of movement, helping him to give you the correct response. Keep your reins up close (but not tight) to inhibit forward movement if he tries that. Put just a tiny bit of contact on the fence-side rein to keep that shoulder over.
Using your leg and heel, give him the same pressure you gave with your fist to tell him to move his rear away. Allow him to shift his weight a little bit at first as he tries to figure out what you want. Restrain all forward movement or shoulder movement away from the fence. He will usually figure it out in about 5 seconds or less. If he does not move or tries to do anything but disengage his rear, correct his position back to the parallel stance and start over. If he moves his rear properly just one step, take your leg pressure off and let him rest with praise.
If he refuses to move, pick up your popper or a short bat or a crop and tap his fanny gently like you did on the ground – keeping your leg pressure steady. This probably won’t be necessary if his “dance step” has been perfected on the ground (and it may take your fence-hand off the rein), but I have had a horse or two that needed the added cue a couple of times. Just touching their fanny reminded them of what it was I wanted them to move.
As you have figured out, it does no good to “spin and spin and spin” wrong. It only teaches a bad habit. Take one baby step as success and build on it – one crossover step at a time. You MUST RELEASE the moment you get one step.
You may need a spotter on the ground to tell you immediately when he has moved correctly.
Here is a great video that demonstrates the fence exercise. She does not concentrate on the cross-over, but your horse will offer it if he has been using it on the ground. Do pay attention to how gently and firmly she handles the exercise. If your horse is a hotter breed who fidgets and dances around, your job of timing will be harder. You MUST catch the right move and release for a stand-still immediately. If your timing is off, your proper response will be muddy and imprecise.