Why a Bit? Start Here
Horse Bits Explained

A horse’s mouth is one of the most sensitive parts of his anatomy. He can discern and manipulate his environment from his first days as an inquisitive foal, chewing on everything, practising separating grass from weed and food from dirt. Bitting a horse and doing it properly is one of the most challenging aspects of horsemanship. The number of bits you own is not the measure of success. Fitting a horse properly takes knowledge, thoughtfulness and experimentation.
This discussion centers on the most basic concepts – some generalized ideas about the types of horse bits available, what areas of a horse’s face are affected by the bit and how some of the features of each type of bit affect each area, and what reaction a horse usually has to a particular type of bit.
The Myler brothers have developed a series of sophisticated bits that address nearly every problem a horse and rider may encounter. They propose that, “to be considered finished, a horse needs to be relaxed in his bridle.In the bridle means that the horse is broke at the poll with his head set on the vertical. He’s supple and giving to the hands and his head stays n position with little or no contact. He’s got his shoulders up, he’s round through the back, engaged through the hind end and balanced underneath you.” That’s quite an order.
Obviously, no single bit is best for all riders, horses or situations. I would suggest (from experience) that no less than about 5 bits (from snaffles to curbs) will usually suffice during a horse’s training depending on how specialized his ultimate performance must be. However, these guidelines might help to choose a few depending on the training desired and the level of experience of both horse and rider.
One factor is paramount to the function of a bit; good horsemanship requires proper use of all the aids used to cue the horse to perform. This includes the type of hands that initiate the pull of the bit.
Every bit can be used “back assward” as the saying goes. Over-pulling can cause results 180 degrees from what you want. Pulling too high or pulling low can completely destroy a bit’s affect. Using two-handed pressure on a one-handed bit can send a horse the opposite of the direction you want. There are far too many variables of training techniques and rider mistakes to give a comprehensive view of every bit in every situation.
The Beginning
A horse bit is designed to put pressure on a horse’s mouth, face or head in such a way that it induces him to change his carriage, direction or speed. The pressure exerted by a bit should be uncomfortable but not painful. While a bit that is poorly designed, misunderstood or mis-handled can certainly produce pain, pain is not the goal.
A horse will soon learn that he is in control of his bit. When he is uncomfortable, he can change his body, direction or speed in such a way as to minimize or completely avoid the discomfort. Soon he is cueing off of other rider aids that communicate the same maneuver that his bit used to communicate – before the bit is even put into action. A well-trained horse ridden by an expert rider will have little need for his bit at all.
To get an idea of how it works, think of your mattress. If you lie on a mattress with a small lump in the middle that makes it uncomfortable to sleep on your back, it will not be long before you realize that sleeping on your side is more comfortable. Should you roll over onto the lump, it is uncomfortable and you will return to your side. Eventually you will avoid the lump altogether quite by habit – rarely ever experiencing the pressure again. Should a friend borrow your bed, his first words would be, “How do you sleep with that lump in the bed?” and you could answer, “I never notice it any more”. And so your sleeping posture would probably be changed for life – with or without that particular bed.
And so it goes with a bit. A horse will find the “sweet spot” where his carriage, direction or speed is totally comfortable – avoiding the bit pressure by habit. He might be occasionally reminded of its presence but will quickly step back into the posture that is comfortable.
Once you have learned how to avoid the lump in the middle of the bed, it can be reduced to a mere reminder. If another lump is added to the bed, you will adapt again, avoiding the lump at your feet while still remaining on your side to avoid the bump in the middle.
And so it goes. Changing bits, changing hand signal, changing body movements until your horse is avoiding all of the “lumps” and performing feats you never thought possible.
A well trained horse uses almost no bit pressure. Other aids cue his every move, and his bit is just a reminder in case of an emergency or a highly distracting situation.
Once you understand the lump-in-the-bed analogy, you can also see how a novice rider can ruin a bit’s effect. If the “lump” is not always there, or if it constantly moves (as when a rider is jerking and hanging on to the reins to keep balance or does not release the pressure when the horse is moving properly) the horse cannot find the “sweet spot” and becomes first confused and then unmanageable.
Why so many Types of Horse Bits?
Bits have come down through the ages from many different cultures and for many different purposes. In modern times, the number and types of horse bits have been expanded even more by combining and re-engineering the originals as well as developing completely new bits for specific training. New competitive endeavors have also required new bits with specific characteristics.
Because each bit causes a horse to react in a predictable way, it is possible you will progress through several bits before your horse is really trained. For instance: One bit may remind him to keep his head low, another may raise his shoulder, another may raise his head, and another may refine his stop or turning techniques.
Bits are placed in the horse’s mouth first to alter his behavior and then to remind him to habitually respond in the expected way. In fact, his musculature actually changes to maintain the maneuver comfortably just as your body changes when you consistently use a particular machine at the gymnasium.
Most horses get ground training in a halter. A trainer gets some control of a horse’s head at that stage. The first bit gives the trainer even more control of the head and face. From that point on, each successive bit will be chosen to give the horse as much relief from pressures he no longer needs (because he has mastered the maneuver the bit was teaching) while putting pressure into a new place to change (teach) another aspect of the performance.
No bit is 100% useful in every situation. Your horse may be “broke to ride”, but will have no finesse or refinement when asked to perform more complicated maneuvers. In fact, using only one bit, he may not even learn many maneuvers because you will have no way to communicate your need for his precise direction or carriage change during a ride.
(Read much more about when and why you could change bits and use multiple bits)
Basic Horse Bit Anatomy
The image below shows the basic parts of a mouthpiece. The “Bar”is sometimes called the Cannon. The Cheek or Shank (if there is one) is attached to the Butt of the mouthpiece.

Some quick concepts to remember when selecting a horse bit:
Different types of riding take different bits. ie: English riding is considered a “close contact” type of riding meaning that the rider has contact (through the reins and bit) with the horse’s face a significant amount of the time. The Western rider on a trained Western horse “throw the reins away” (is not in very much contact with the horse’s face) about 85% of the time. The “rule” for Western riders is to “stay out of the horse’s face” as much as possible.
Horse bit mouthpieces can be made of different types of metals, hard rubber or flexible rubber. Each bit type yields a different effect. Each horse has a preference for the feel of a mouthpiece as well as the response he gives to each.
Generally speaking, the thicker the mouthpiece the milder the bit, because the bit pressure is spread over a larger area on the horse’s mouth. The thinner the mouthpiece, the more severe the bit.

Some bits have loose cheeks or swivel cheeks (left) and some have the butt of the bit welded solidly to the cheeks (a fixed-cheek bit – frequently a curb bit). Those with a loose shank are made to ride with two hands. A fixed-shank bit is best used with one-handed reining.
The length and proportions of the shanks (cheeks) dictate the amount of curb pressure and leverage (pressure applied to the chin groove, palate, tongue and bars of the horse’s mouth). Longer shanks (such as the black bit above) magnify the rider’s hands and apply more pressure. Short shanks or no shanks at all (such as the silver eggbutt snaffle above) apply the least pressure. See: Shanks
There are various mouthpiece configurations. Each mouthpiece helps to determine the function of a bit. Some apply direct pressure for lateral movement. Some apply correcting pressure for faster response. Some help to elevate a horse’s front. Others bring his head down, arch his neck, or teach him to raise his shoulder. There are a myriad of pressure combinations depending on the task required.
Horse Bit Mechanics Apply pressure to Different Pressure Areas:
The different parts of a bit mouthpiece are made to sit or put pressure on specific areas of the mouth to encourage the horse to perform a specific maneuver when that area is pressured.
There are five main pressure areas that are contacted by bits. Different type of horse bits contact different parts of the horse’s mouth and chin in different ways – depending on the amount of pressure applied by the rider’s hands through the reins and how that pressure is translated into mouth pressure. (see Bit Leverage)
Types of Horse Bit Pressure:
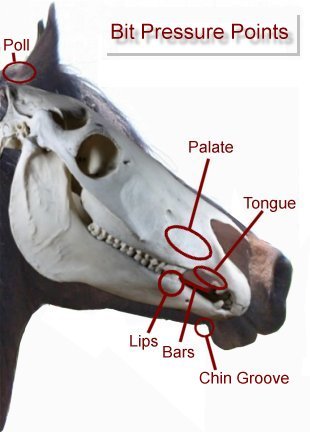
1. The Roof of the mouth (palate)
2. Inside Bar and Outside Bar Pressure: Space between the front incisors and the horse’s molars (see Bars)
3. Tongue
4. The area under the chin where a curb chain fits (curb area)(see Curb Chain)
5. Outside Lip
Bit Neutrality:
For a bit to be suitable to communicate a particular cue, it must be absolutely neutral when the horse is performing the requested maneuver. ie: it must exert no pressure whatsoever when the required position or maneuver is achieved. The shape of the bit and its balance are critical to its ability to apply pressure and then release pressure when compliance is achieved. (see Release Training) For instance: if you wish for your horse to travel with his face vertical, the bit must be neutral when his face is perpendicular to the ground. He gets relief from any bit pressure in that position only.
Types of Horse Bits:
1. Snaffle Horse Bits usually break in the middle. The exception is the Mullen mouth bit (see below). Pressure starts at the horse’s outer mouth. As more pressure is applied it begins to affect the horse’s bars, then the tongue. They are ridden with two hands, each side of the bit moving independently of the other and each side of the face being cued up or down without disturbing the other. Pressure on the inside of a turn pulls the face into the turn on the inside and presses against the face on the other side to bring the face around into the turn. Generally speaking a snaffle is a very good tool for teaching a horse to turn, but is a poor stopper.
2. Curb Bits are frequently identified with cowboy bits or western horse bits. They often have a solid mouthpiece and have varying heights of center port. The port either gives relief to the tongue or is used to pressure the palate or both depending on how high it is. They also apply pressure to the bars of the mouth, the chin, and the poll. (see Poll) Those with solid mouthpieces and fixed cheeks are meant to be ridden with one hand only. Generally speaking a curb bit is a poor turner but a great stopper. However, with a little too much pull it may cause a horse to throw its head out of the turn or up to escape the curb pressure.
3. Pelham Bits and double Rein Bits are made to allow the use of two reins at one time and combine the attributes of the D-Ring Snaffle with the Curb Bit. In other words, they can be ridden with or without leverage and curb action depending on which rein is taken up. They are an effort to solve the deficiencies of both the snaffle and curb used alone. If a rider has enough coordination to handle two sets of reins, these are the best of both worlds.
4. Gag Bits: The sliding action of the Gag Bit applies pressure to the lips and corners of the mouth. This action along with the give and take of the rider’s hands help elevate the horse’s front end. Some Gag Bits offer variable rein loops for more or less leverage.
5. Mullen Mouth Horse Bits have a solid bar mouth with slight curve. Generally considered a very mild mouthpiece, they are often used as colt starting bits. The straight mouthpiece or the slight curve provides extra space for the tongue instead of constantly pushing into it. However, it does not have as high a port as a curb bit so does not give as much tongue relief as a curb. It places slight pressure on the tongue but mostly on the lips, and bars. (No palate pressure is possible.) When pressure is applied to the reins, the straight mouthpiece presses down on the bars and back on the lips. The curved mouthpiece rolls forward and onto the tongue, taking his tongue away from the horse as the curve moves forward and down. There is no dramatic point of pressure, but the tongue is compressed and the bars are pressured.
6. Correction Mouth Horse Bits have high ports or jointed port mouths and leveraged cheeks. The jointed port mouth can be quite severe as it applies tongue pressure at the flexible joint of the port as well as bar pressure.
Solid High Ports such as Cathedrals and spooned ports make contact with the palate of the horse – some in more severe ways than others. The rider’s soft hands are critical here. The balance of a Spade or Cathedral bit is critical, as they must be ridden straight-up neutral to keep the spoon off the roof of the mouth unless rein pressure is purposely applied. When the reins are pulled, the spoon moves forward and up. When the reins are relaxed, the spoon drops down again. If the horse’s head remains vertical and the reins remain loose, the spoon should remain flat and exert no pressure on the horse’s palate at all. Spades are usually used on the most highly trained and softest horses. They should be used with finesse to “signal” a highly trained horse with almost no movement. They heighten softness and vertical flexion with practically no movement. A horse whose bars have been ruined by poor riding in another type of bit might benefit from a spoon mouth IF his rider is a particularly good trainer and rider.
Some horse bits have rollers (sometimes called crickets) in the center of the bit that will relax a young, inexperienced horse if he is a little up tight. By playing with the rollers his attention is diverted and his jaw is relaxed. It sometimes makes it easier to get him to hold (take or carry) the bit.
Horse bits are made of different materials. Many are designed specifically to produce salivation (Copper and Sweet Iron). It is posited that a salivating horse is a more relaxed horse. He is moving his tongue and relaxing his lower jaw, which also relaxes his pol, neck and spine. This makes it more comfortable for him to wear the bit and enhances his training sensitivity. A horse with a closed mouth has a tight and stiff jaw, stiff poll and tension along his neck and spine. A salivating horse does not have a rigid conformation.
There is some controversy surrounding this theory – specifically by Dr Cook, the originator of the Bitless Bridle.
To achieve the most effective results from bitting a horse for specific use, make sure you have measured your horse’s mouth properly. (see Bit Fit)
Truism: The hands that control the bit can greatly exaggerate the severity of any horse bit. The less severe your bits and the lighter your hands, the longer you will have a light-mouthed horse. (see Hard Mouth)
See: More Considerations for Choosing a Bit
See: How to Measure your Horse’s Mouth for a Bit
We certainly don’ t know everything. Please share your expertise an d experiences. Comment on what is already written or Suggest a Category and Educate us about it. Grow Horse-Pros.com©
[…] J. (2016a) Bits, Horse – Intro. Horse-Pros.com. [online]. Available from: http://horse-pros.com/5623/bits-horse-intro [Accessed April 5, […]