
Preparation: Brush, wash, and dry your horse to get any grime or dirt from under the hair. Dirt will dull your blades as well as leave track marks on his body. Use a body sheen product to slick the coat so that the blades will slide through easily and static is minimized.
As discussed throughout this website, start with your horse untied but haltered with a lead rope.
If this is the first time your horse has been introduced to clippers, use the de-sensitizing techniques to get him used to the clippers: first with them turned off as they approach and touch, then with them turned on in a similar fashion. When he is fully de-sensitized, you can begin the job of taking the hair off of his body.
Nearly all parts of his body will be clipped AGAINST the growth of the hair. That is BENEATH the hair, not over the top of the hair.
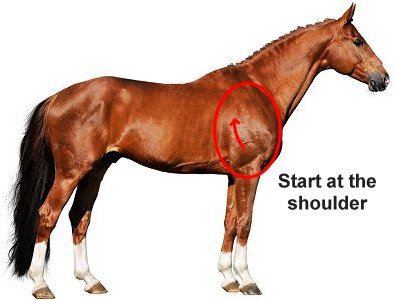 The shoulder is generally the best place to start. It is the least sensitive, so a horse that is new to clipping will tolerate this area better than his face or back or fanny.
Let him get used to the feel and sound of the clipper here first. Touch him with it, massage him with it , then start the clipping just above the elbow and go up. Remember that you clip against the way the hair grows. On his chest, flank and under his neck there are swirls that get clipped up or down or sideways depending on which way the hair grows.
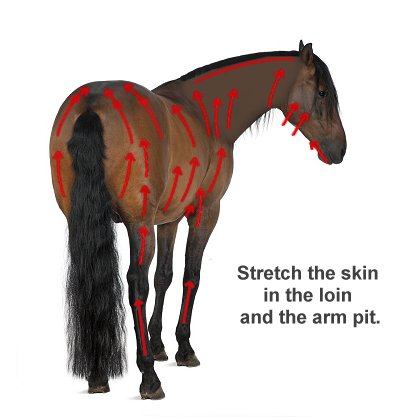 Areas such as his neck creases and arm pits must be “stretched” so the skin is stretched smooth and the blade can glide over the surface and not grab folds of skin or poke the blade into the creases.
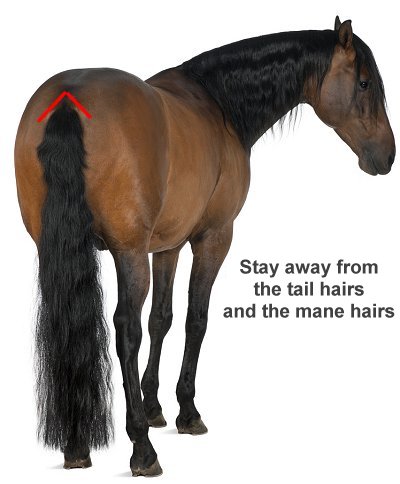 At the top of the tail, be very careful not to run your blade into any tail hair. The same is true of the mane. If using large clippers be extra careful of the areas next to the long mane hairs. A smaller set of clippers works best in these areas where precision is important.
The face and ears are the most sensitive areas. You can expect some resistance here. Gently persist so that he doesn’t get the idea that head-throwing and objecting is successful in getting you to stop.
He will, generally behave better if not unduly restrained. Or a 2nd person can help to keep him occupied and calm. Treats sometimes help to reward standing still and to divert his attention.
If this is your first clip, don’t expect this job to go smoothly. Either the horse will give you trouble moving all over the place, or you will find yourself leaving track marks in the coat.
Tracks are caused by “cross-cutting” the hair. That means that you have not exactly followed the hair growth. If you follow the hair growth exactly backward, it will be smooth. If you get off that exact backward line, the hair will cut in a choppy angle and leave marks. If you get some tracks, you can sometimes take them out by re-clipping the area correctly. However, sometimes they will not come out. If you are unpracticed at this job, don’t do it right before a show. It takes time to become skilled.
While many people use two sets of clippers (one on the larger body parts and one for the finer areas such as the lower legs, face etc) I recommend a good set of smaller clippers with plenty of torque and a wide blade for the body, an 8-1/2 blade for the tighter areas of the legs, and a #10 blade on the face (against the growth of the hair). These smaller clippers weigh less and are easier to manage all the way around.
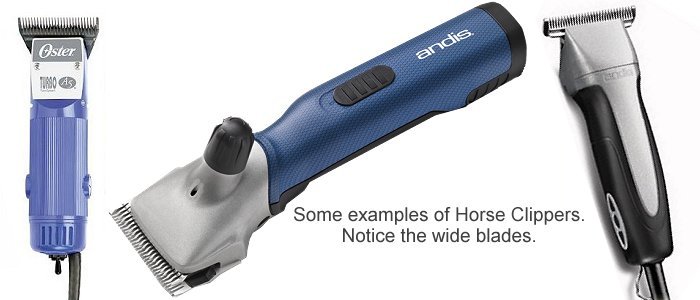
The smaller Oster Turbo A-5 2 Speed Clippers and the Andis 5 Speed with T-84 blade are two of my favorites. They are less expensive than the giant livestock fitting models and will do a full body clip in a jiffy with more precision and less arm fatigue. They also take a wider assortment of blades and are easier to change.
See these excellent videos.